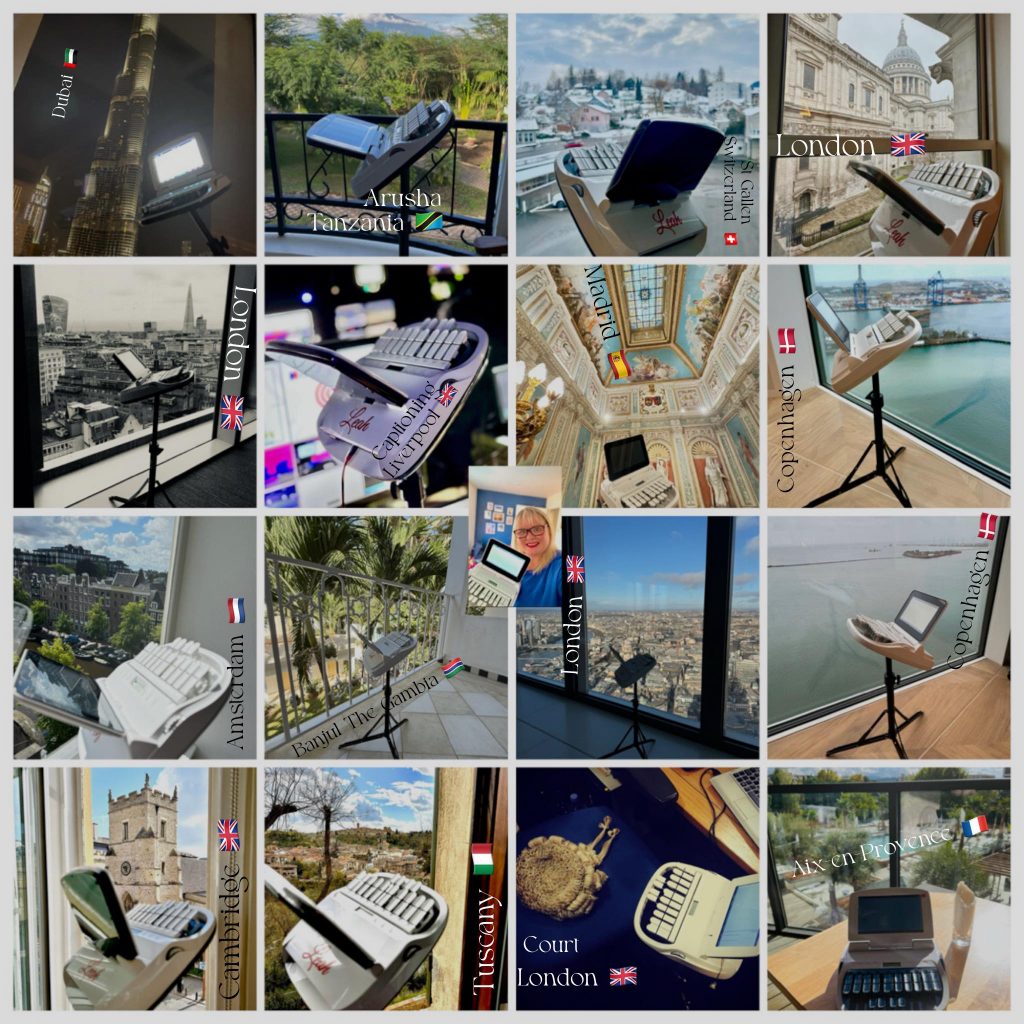
Question:   I was wondering if there’s a command that I can use to essentially squish words as they translate. I need an easier way to squish words together for web site names other than stroking each word and using my defined <Delete Space> stroke between each one. Is there something I can write, say, at the beginning and end of an email address or a web site to squish the whole thing together?

Answer: Define a command as {Stitch On} [WEB] and write it before words and letters that must be “squished together” and appear in all lower case. Then, write a stroke defined as {Stitch Off} after that. Or, you can combine the {Stitch Off} command with the domain name (e.g. define your steno for .com as .com{Stitch Off}, define your steno for .net as .net{Stitch Off}, etc.).

If you click Help, Exceptional Extras, Using Extras Fingerspelling Dictionary, you’ll see that the Extras Fingerspelling Dictionary already contains entries for these commands.  You can use them as defined, or modify the steno as needed to reflect what you prefer to write.

For any items that have translated incorrectly that you want to “squish” post-translation, there’s a built-in command in Edit. Just mark the words that need to squish together and then select the preferred define or replace command (e.g. D-define, K-define, J-define, E-define, Replace). Press Alt+c or click the Spaces button twice. The first time you press Alt+c or click Spaces, it will insert <Sticky Space> format symbols between the words. The second time you press Alt+c or click Spaces, it will remove all spaces between the words.  You can also use the Cap command (Alt+a) to change capitalization, if/as needed. For example, suppose you wrote steno that translated with unwanted spaces and capitalization, such as www. Microsoft.com.  You’d mark it, select the preferred define or replace, press Alt+c twice, and then Alt+a (or click Cap) three times (to cycle from initial capped: Www.Microsoft.Com, to all capped: WWW.MICROSOFT.COM to all uncapped: www.microsoft.com.)

Do you have a Case CATalyst question you’d like to see answered in the RAQs?  E-mail it to RAQ@stenograph.com.

Case CATalyst Recently Asked Questions are written by Cindi Hartman, Stenograph’s Training Program Manager.

  • Facebook
  • Twitter
  • Google Bookmarks
  • email

Question:  I have the phrase “not signed within thirty (30) days” in stipulations at the end of my title pages, which I autoinclude.  I use Automatic Number Conversion.  When I autoinclude my title pages, number conversion changes the above phrase in the include file to “not signed within 30 (30) days.” Is there a way that I can prevent this from happening?

Answer:  Yes.  Insert the <No Auto Convert> format symbol before the word thirty. FYI, to insert <No Auto Convert> into a text file, you must use a dialog box. Open the include file in Edit and position the cursor at the beginning of thirty. Then, either press Ctrl+i and use the Insert Conflict/Text dialog to insert <No Auto Convert> before the word thirty, or press Ctrl+r to replace and replace thirty with <No Auto Convert> thirty.

Do you have a Case CATalyst question you’d like to see answered in the RAQs?  E-mail it toRAQ@stenograph.com.

Case CATalyst Recently Asked Questions are written by Cindi Hartman, Stenograph’s Training Program Manager.

  • Facebook
  • Twitter
  • Google Bookmarks
  • email

Question:  I’m using Case CATalyst 12.52. I’m trying to build a dictionary via Dictionary Builder. I can’t seem to make a connection when I connect my Diamante via USB and select Diamante or Diamante-USB at the Writer prompt.

Answer: In Dictionary Builder, Select Wave-USB instead of Diamante-USB. FYI, this is a temporary workaround for an issue that is fixed in Case CATalyst Version 13. Once you update to Version 13, you can select Diamante-USB again.

Do you have a Case CATalyst question you’d like to see answered in the RAQs?  E-mail it toRAQ@stenograph.com.

Case CATalyst Recently Asked Questions are written by Cindi Hartman, Stenograph’s Training Program Manager.

  • Facebook
  • Twitter
  • Google Bookmarks
  • email

Question: When I build a concordance index, instead of having a standard page number, I want it to look kind of like you’d see things in a dictionary or an old-fashioned phone book, where it lists the first word on the page to the last word on the page.  Is that possible?

Answer: Sure, and it’s actually very easy to set up and use.  You’ll simply set up a page layout with the first and last indexed word fields in a header, positioned where you want them to be, and then when building the concordance index, you’ll specify that you want to use the headers from that layout.

So first, create the new layout. You’ll do this once, only. Click Layout on the Function Bar, or click Function, Layout. Type a name for the new layout (e.g. Concordance Headers) and then press Enter (or click Open).

  1. When prompted: “The file does not exist. Would you like to create it?” click Yes.
  2. In the Layout dialog pane, click the right arrow to move to Headers & Footers.
  3. In the Header/Footer text field, delete [!Page Number – 1,2, 3…].
  4. Click Insert Field.
  5. Select First Indexed Word on Page and click OK.
  6. Type a hyphen.
  7. Click Insert Field.

10.  Select Last Indexed Word on Page and click OK.

11.  If you want the Horizontal or Vertical positions to be different, adjust those settings as preferred.

12.  Click Apply.

13.  Close and save the changes to the layout.

In Edit, the next time you’re ready to build your concordance index, you’ll click Tools, Build Concordance Index.  When you see the Concordance Index Options dialog box, on the left side of that dialog box select the option Use Headers From Layout. You’ll be prompted to select the layout that contains the headers you want to use.  Select the layout you created with the indexed word header (e.g. Concordance Headers).

FYI, Case CATalyst will remember your previous selections in the Concordance Index Options dialog box. You will not have to select the Use Headers From Layout option or select the layout each time you build a concordance index!

Do you have a Case CATalyst question you’d like to see answered in the RAQs?  E-mail it to RAQ@stenograph.com.

Case CATalyst Recently Asked Questions are written by Cindi Hartman, Stenograph’s Training Program Manager.

  • Facebook
  • Twitter
  • Google Bookmarks
  • email

Question: My firm wants me to insert a header that says Deposition of (whatever the witness’s name is) above the box line at the far left margin.  So I went into Modify Layout, went into Headers and Footers, selected Header #1, and typed the text.  At Horizontal, I selected Left Margin and under Vertical, I select Exactly and input 0.5 inches from the top of page.  It looks just fine vertically, but it’s indented way too far in.  How do I tell it where the Left Margin is supposed to be?

Answer: Case CATalyst uses the Left and Right Margin values from the Default Paragraph style for Header and Footer positions.  So, go into the Paragraph Styles section of Modify Layout, select the Default Paragraph style, and set the Left Margin value where you want your header to line up.

Do you have a Case CATalyst question you’d like to see answered in the RAQs?  E-mail it to RAQ@stenograph.com.

Case CATalyst Recently Asked Questions are written by Cindi Hartman, Stenograph’s Training Program Manager.

  • Facebook
  • Twitter
  • Google Bookmarks
  • email

Question:  A friend of mine who is also on Case CATalyst 12.5 was telling me she saves a lot of time by fixing punctuation with the various punctuation shortcuts in her keyboard map. I don’t know any of punctuation shortcuts – do I have those in my Case CATalyst or do I need to create macros or what?

Answer: You have a number of punctuation functions; you just need to learn what those functions are and how to access them.

One quick way to see groups of functions listed together is to open your keyboard map and then filter the view by function.

  1. Open any file in Edit and then double click the name of the keyboard map listed on the Status Bar, next to Kbd map: (or click File, Open, List/Table, Keyboard Map and then select the name of the keyboard map you use in  Edit.)
  2. Click View, Filter, or click the Filter icon on the toolbar, or press Ctrl+Y.
  3. In the Filter dialog box, at Filter, click the down arrow and select Function.
  4. Click the Entry Type option.
  5. Click the down arrow next to Cursor Movement to display the list of categories of functions.
  6. Select the desired category (e.g., to see all functions related to punctuation and the keys to which those functions are assigned, click Punctuation).
  7. Click OK.

There are a number of methods you can use to learn about each of these functions, but the best place to start will be with Case CATalyst Help: look up the name of the function and read the associated Help topic.

Do you have a Case CATalyst question you’d like to see answered in the RAQs?  E-mail it to RAQ@stenograph.com.

Case CATalyst Recently Asked Questions are written by Cindi Hartman, Stenograph’s Training Program Manager.

  • Facebook
  • Twitter
  • Google Bookmarks
  • email

Question: I’m using Version 12 and I’ve downloaded the latest update. I have a bunch of jobs showing in Manage Jobs that I’ve finished, but they show up in different colors, depending on whatever was the last thing I did with them. For example, some are brown because the last thing I did was send the job to the printer and some are green because I made ASCIIs.  How do I change all of them to the same color so I can see that the job is done and I don’t have to deal with those jobs anymore? (I don’t want to delete them; I prefer to keep them where they are.)

Answer: Select each of the jobs (hold down Ctrl when clicking to select additional jobs). Right click one of the selected jobs, and click Change Job State.  In the Job History for Selected Files dialog, at the Current State prompt, click the drop-down list of job states, and select Done, then click OK.  All of the jobs will be changed to the Done state

Do you have a Case CATalyst question you’d like to see answered in the RAQs?  E-mail it to RAQ@stenograph.com.

Case CATalyst Recently Asked Questions are written by Cindi Hartman, Stenograph’s Training Program Manager.

  • Facebook
  • Twitter
  • Google Bookmarks
  • email

Question: When I close out of a file in Edit, I get the save message and I have the option to change the job state to “In Progress,” “Final Edit,” or “Proofread.”  “In Progress” and “Proofread”  kind of make sense to me but I have no idea what Final Edit is supposed to mean – does that mean what I do after I get the job back from the scopist, or when I’ve got it back from my proofreader and I need to make changes?  I wish my choices were Sent to Scopist, Sent to Proofer, and Review Before Delivery.

Answer: You can change the names of these job states to whatever you prefer!  To customize a job state name:

  1. In Manage Jobs, click Tools, Options, Manage Jobs/General, Job States (or press Alt+t, o, j, o).
  2. Click the field to the right of the default job state name (or color) you want to modify.
  3. Double click the current job state name to select it (or click once on the name, and backspace/delete the text).
  4. Type a new name.
  5. Optional:  to select a different color for the job state, click the down arrow at the right of the field and pick from one of the six available colors.
  6. Click OK.

If the job state is assigned to a particular function, the new name is automatically applied when you perform that function.  If it is not assigned to a particular function, you can assign the new job state name as desired (for example, when closing out of Edit, or by selecting the Change Job State function in Manage Jobs).

Do you have a Case CATalyst question you’d like to see answered in the RAQs?  E-mail it to RAQ@stenograph.com.

Case CATalyst Recently Asked Questions are written by Cindi Hartman, Stenograph’s Training Program Manager.

  • Facebook
  • Twitter
  • Google Bookmarks
  • email

Question: It used to be that when I clicked and dragged the edge of my Reveal Codes, the text in the Reveal Codes window would be bigger or smaller.  Ever since I updated to Version 12, I’m seeing more text in Reveal Codes – which I really like — but the size doesn’t change.  How do I make it bigger or smaller

Answer: You can modify the size of the font. You can also change the font type if you want!

  1. Click the Reveal Codes pane to put the cursor focus in that pane.
  2. Right click the Reveal Codes pane and select Reveal Codes Font.
  3. Select the desired font type, style and size.

Do you have a Case CATalyst question you’d like to see answered in the RAQs?  E-mail it to RAQ@stenograph.com.

Case CATalyst Recently Asked Questions are written by Cindi Hartman, Stenograph’s Training Program Manager.

  • Facebook
  • Twitter
  • Google Bookmarks
  • email

Question: I’m on Version 12. I’ve just started a series of jobs which are going to involves appearances from attorneys from other countries.  My include file for my appearances uses the Field List Group fields ([!ATTORNEY1], [!FIRM1], [!ADDRESS-A1], etc.) for each appearance, but it only has City, State, Zip – no Country.  Is there any way I could create a [!COUNTRY1] field for each of my field groups?

Answer: Yes, you can.

  1. Open up your Fill-in-Field List file.
  2. Either click Edit, Insert Column or right click any of the column headings and then select Insert Column.
  3. Type a name for the new field (e.g. COUNTRY) and then click OK.
  4. Close and save the changes to the Fill-in-Field List file.
  5. Go into your include file for your appearances, and position the cursor where the new field group item (e.g. COUNTRY) should be inserted.
  6. Click Edit, Insert, Field.
  7. In addition to the all of the other fields in each group, you will now see a the new field name you typed (e.g. COUNTRYn).  Select it and click Insert.

Do you have a Case CATalyst question you’d like to see answered in the RAQs?  E-mail it to RAQ@stenograph.com.

Case CATalyst Recently Asked Questions are written by Cindi Hartman, Stenograph’s Training Program Manager.

  • Facebook
  • Twitter
  • Google Bookmarks
  • email